- Why Reusable Ice Packs are the Smartest Way to Chill Your Cold Plunge
- Finding the Right Size: Large Ice Packs vs. Standard Gel Sheets
- Cooling Methods Comparison: Ice Packs vs. Chillers vs. Raw Ice
- Is Solar Power a Viable Option for Cooling?
- The DIY Barrel Blueprint: From Rain Barrels to Utility Totes
- Converting the Husky 170 Gallon Tote for Maximum Space
- Choosing the Best Water Trough for Outdoor Use
- Premium Immersion: The Aesthetics of Wooden and Cedar Barrels
- Finding a Quality Cedar Cold Plunge Manufacturer
- Technical Deep Dive: Redwood Outdoors Alaskan All-in-One Specs
- Temperature Range and Sizing for the Alaskan Kit
- The Essential Accessory Checklist for a Safe Session
- Thermal Protection: Water Socks and Best Plunge Robes
- Portable and Budget-Friendly Plunge Solutions
- Mini Travel Bags and Foldable Tanks for Athletes on the Go
- Expert Perspective: Cold Water Maintenance
- Frequently Asked Questions
Why Reusable Ice Packs are the Smartest Way to Chill Your Cold Plunge
The daily logistics of maintaining a cold plunge often surprise beginners who expect a one-time setup. If you rely on purchasing 20-pound bags of ice from the local gas station, you will quickly realize that the recurring cost can exceed $300 per month during the summer season. Transitioning to a reusable system is not just about saving money; it is about controlling the environment of your recovery sanctuary.
Reusable ice packs offer a level of thermal consistency that loose ice cannot match. When you dump loose ice into a 100-gallon tank, it melts rapidly, diluting your water and potentially introducing contaminants or chlorine-heavy tap water into your carefully balanced tub. By using sealed containers, you maintain the water level and chemistry while achieving the necessary temperature drop through efficient heat exchange.
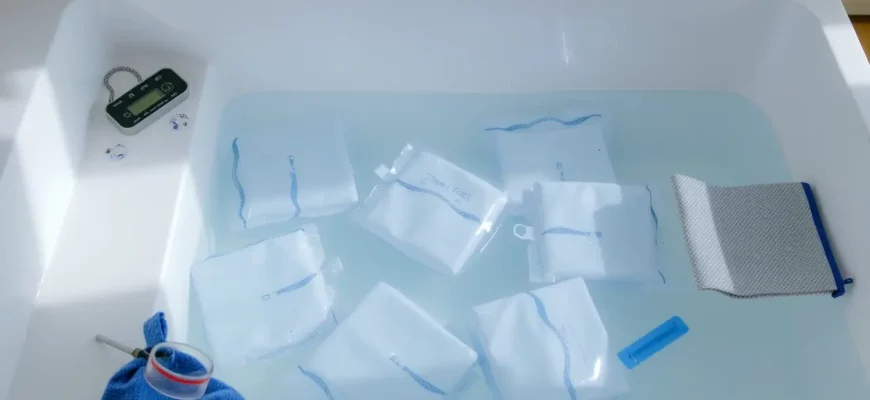
Finding the Right Size: Large Ice Packs vs. Standard Gel Sheets
To effectively drop the temperature of a large volume of water, you must understand the principle of thermal mass. A standard gel pack designed for a lunchbox will thaw in minutes without making a dent in a 50-degree plunge. For serious cold water immersion, you need heavy-duty ice blocks that weigh at least 5 to 10 pounds each to ensure the core of the pack remains frozen long enough to absorb the ambient heat of the water.
Durability is the primary concern when selecting these cooling agents. Many standard gel sheets use thin plastic films that can puncture when clashing against the side of a metal stock tank or a wooden barrel. Look for high-density polyethylene (HDPE) casings that are rated for food-grade use. These rigid containers can withstand the pressure of being stacked in a deep freezer and the impact of being dropped into a full tub without leaking chemical gels into your soaking water.
Cooling Methods Comparison: Ice Packs vs. Chillers vs. Raw Ice
Choosing how to cool your water depends entirely on your budget, your available time, and your tolerance for manual labor. While a dedicated chiller offers “set it and forget it” convenience, the initial investment can be staggering for those just starting their hydrotherapy journey.
| Method | Initial Cost | Daily Effort | Temperature Control |
|---|---|---|---|
| Reusable Ice Packs | $100 ⎯ $200 | Moderate (Swap daily) | Manual adjustment |
| Electric Water Chiller | $800 ⎯ $2,500 | Low (Automated) | Precise digital control |
| Loose Bagged Ice | $5 ⎯ $20 | High (Constant trips to store) | Inconsistent |
Is Solar Power a Viable Option for Cooling?
As home wellness setups move outdoors, many enthusiasts wonder if they can run their cooling systems off the grid. While a solar-powered cold plunge is technically possible, it requires a significant battery bank to handle the high startup surge of a 0.5 HP or 1 HP compressor. Most standard chillers pull between 400 and 800 watts during active cooling cycles, meaning you would need a robust solar array to keep the water at 45°F during peak summer heat.
If you are determined to use solar, the most efficient path is to run your chiller during peak sunlight hours to “over-cool” the water, then rely on high-quality insulation to maintain that temperature through the night. This reduces the strain on your battery storage and takes advantage of the highest energy output from your panels. For DIY setups, using solar to power a simple circulating pump that moves water through a radiator submerged in an ice chest can be a more affordable middle ground.
The DIY Barrel Blueprint: From Rain Barrels to Utility Totes
Building your own setup is a rite of passage for many in the recovery community. The goal is to find a vessel that balances water volume with a footprint that fits your patio or garage. Rain barrels are a popular starting point because they are designed to hold weight, but they often require aftermarket modifications like bulkhead fittings to allow for easy drainage and cleaning.
Ergonomics play a huge role in whether you will actually use your tub. A vessel that is too tall makes entry and exit dangerous when your muscles are shivering and your grip strength is compromised. When selecting a container, ensure the rim height is manageable or plan to build a sturdy step platform to ensure you can enter the water safely without slipping.
Converting the Husky 170 Gallon Tote for Maximum Space
The Husky 170-gallon professional duty tote has become a cult favorite for DIYers because of its massive capacity and relatively low price point. Unlike smaller storage bins, this tote features reinforced ribbing that prevents the walls from bowing out under the immense pressure of nearly 1,400 pounds of water. However, because the plastic is relatively thin compared to a dedicated tub, adding a layer of 2-inch spray foam or reflective bubble insulation to the exterior is vital for keeping the water cold in a garage environment.
To maximize the lifespan of a Husky tote setup, you must focus on the base support. Placing this much weight on an uneven concrete floor can lead to stress fractures in the plastic. Always place a 3/4-inch rubber stall mat under the tote to distribute the weight evenly and provide a thermal break between the cold water and the warm ground.
Choosing the Best Water Trough for Outdoor Use
If you plan on keeping your setup outdoors year-round, a galvanized steel or heavy-duty plastic stock tank is the gold standard. Metal troughs offer a classic aesthetic and incredible durability, but they are poor insulators. In direct sunlight, a metal tank will act like a radiator, heating your water faster than you can cool it. If you go the metal route, lining the interior with a pond liner or painting the exterior with heat-reflective paint is a necessary step for thermal regulation.
Plastic stock tanks, specifically those made by brands like Tuff Stuff or Behlen, are often the better choice for temperature retention. These tanks are molded from high-density plastic that doesn’t corrode and feels more comfortable against the skin than cold metal. When choosing a size, a 100-gallon oval tank is usually sufficient for individuals up to 6’2″, allowing for a full-body soak without requiring an excessive amount of ice to reach target temperatures.
Premium Immersion: The Aesthetics of Wooden and Cedar Barrels
For those who view their cold plunge as a permanent fixture of their home wellness sanctuary, premium wooden barrels offer an experience that plastic tubs cannot replicate; Western Red Cedar and Redwood are the preferred materials because they contain natural oils and tannins that make them inherently resistant to rot, decay, and microbial growth. The aromatic experience of cedar also adds a sensory layer to the recovery process, helping to calm the nervous system during the initial cold shock.
| Feature | Cedar/Redwood Barrels | Plastic/Composite Tubs |
|---|---|---|
| Insulation | Excellent (Natural thermal properties) | Poor (Requires added foam) |
| Durability | Lifelong with proper oiling | 10-15 years (UV degradation) |
| Maintenance | High (Must stay wet to prevent leaks) | Low (Wipe and go) |
| Aesthetics | Spa-like, luxury feel | Industrial or utilitarian |
Finding a Quality Cedar Cold Plunge Manufacturer
When shopping for a wooden barrel, the quality of the joinery is more important than the wood species itself. A high-end manufacturer will use precision-milled staves with tongue-and-groove joints that swell when wet to create a watertight seal. Avoid cheap “decorative” barrels that use simple flat-edged slats, as these will inevitably leak as the wood expands and contracts with temperature changes.
Maintenance is the trade-off for the beauty of wood. You cannot leave a cedar barrel empty for long periods, or the wood will dry out and the staves will shrink, causing the barrel to lose its structural integrity. Always keep the barrel at least 20% full or use a dedicated hydrating cover to maintain the moisture content of the wood. Periodically treating the exterior with a UV-resistant oil will prevent the cedar from turning grey over time.
Technical Deep Dive: Redwood Outdoors Alaskan All-in-One Specs
The Redwood Outdoors Alaskan kit is often cited as the benchmark for a “prosumer” cold plunge setup. It combines the aesthetic appeal of a traditional Scandinavian tub with a modern, high-performance cooling system. This is not a DIY project; it is a fully engineered system designed for users who want commercial-grade cooling power in a residential footprint.
The heart of the Alaskan system is its chiller unit, which is designed to operate in extreme outdoor conditions. Unlike indoor-only chillers, this unit features weather-resistant housing and a heavy-duty pump that can circulate the entire volume of the tub multiple times per hour. This ensures that thermal layers do not form around your body, which is a common issue in static tubs where the water immediately surrounding your skin warms up.
Temperature Range and Sizing for the Alaskan Kit
The Alaskan kit is capable of reaching a minimum temperature of 37°F (3°C), which is significantly colder than most DIY setups can achieve. This temperature is maintained by a 0.5 HP chiller that utilizes a 20-micron pleated filter and an integrated ozone sanitation system. This means you spend less time changing water and more time focused on your recovery protocol.
The footprint of the Alaskan tub is approximately 40 inches in diameter, making it compact enough for most decks but deep enough for a 6’5″ athlete to submerge to the neck. If you are replacing a smaller plastic unit, ensure your deck can support the concentrated weight of the filled Alaskan tub, which can exceed 1,200 pounds. The manufacturer provides specific replacement parts for the seals and filters, ensuring that the unit remains operational for a decade or more.
The Essential Accessory Checklist for a Safe Session
The tub and the water are only half of the equation. To get the most out of your session without risking injury or unnecessary discomfort, you need a kit of accessories designed for extreme thermal environments. Safety should always come first, especially when dealing with the vasoconstriction that occurs during the first 60 seconds of immersion.
- High-traction waterproof mat: Place this around the exit zone to prevent slips when your feet are numb.
- Floating digital thermometer: Never trust your “feeling” of the water; always verify the temperature before entering.
- Insulated locking lid: This is the single most effective way to keep debris out and cold air in.
- Submersible LED light: Essential for safety if you prefer early morning or late-night plunges.
- Skimmer net: A simple tool to remove surface oils and dust before they clog your filter.
Thermal Protection: Water Socks and Best Plunge Robes
Many people find that their feet and toes are the “weak link” that forces them out of the water before they reach their target time. This is because the extremities have a high surface-area-to-volume ratio and lose heat rapidly. Wearing 3mm to 5mm neoprene water socks can protect the sensitive nerves in your feet, allowing you to stay in the water long enough to trigger the systemic metabolic benefits you are after.
Post-plunge care is just as important as the soak itself. When you exit the water, your body experiences the “afterdrop,” where cold blood from your extremities returns to your core, causing your internal temperature to continue falling. An oversized, heavy-weight terry cloth or microfiber robe is essential for trapping body heat immediately. Look for robes with a hood to prevent heat loss through the head, which is one of the fastest ways to stabilize your core temperature.
Portable and Budget-Friendly Plunge Solutions
You do not need to spend thousands of dollars to access the benefits of cold water therapy. The market for portable tanks has exploded, offering athletes a way to maintain their routine while traveling or living in apartments with limited space. These units are typically made from triple-layered PVC with a polyester mesh core, providing a surprising amount of durability for a “bag” style tub.
The key to success with a budget tank is insulation. Most “cheap” tanks are thin and will lose their chill in under an hour. To combat this, look for tanks that include a thermal top cover and consider wrapping the exterior with an aftermarket insulating jacket. Even a basic foldable tank can maintain 50°F water for several hours if it is kept in the shade and properly covered between uses.
Mini Travel Bags and Foldable Tanks for Athletes on the Go
For those who travel for competitions, a mini travel cold plunge bag is a game-changer. These are essentially ultra-durable, insulated dry bags that can be filled with hotel ice and water. While you won’t get a full-body soak, submerging your legs and hips in a travel bag provides significant recovery benefits for runners, cyclists, and field athletes. These bags fold down to the size of a sleeping bag, making them easy to toss in a trunk or check as luggage.
Setup time for a foldable tank is usually under 10 minutes, involving a few structural support poles and an inflatable rim. While they aren’t as “solid” as a Husky tote or a cedar barrel, they are perfectly functional for 2-3 sessions per week. Just be mindful of the drainage valve; budget models often use plastic threads that can strip easily, so always hand-tighten your hose attachments to avoid permanent leaks.
Expert Perspective: Cold Water Maintenance
In my professional experience as a recovery coach, the biggest mistake people make isn’t the temperature—it’s the hygiene. I always advise my clients to maintain a temperature range of 45°F to 55°F for the best balance of metabolic stress and safety. If you go below 40°F, the risk of cold injury increases without a linear increase in benefits. To keep your water safe without harsh chemicals, add 1 cup of 35% food-grade hydrogen peroxide weekly and use a 50-micron filter to catch skin cells and debris. This keeps the water crystal clear and prevents the “biofilm” slime that often plagues DIY barrels.
Frequently Asked Questions
To drop the temperature by 10-15 degrees in a 100-gallon tank, you typically need 10 to 15 large 5-pound ice packs. The exact number depends on the ambient air temperature and how well your tub is insulated.
Can I use a regular rain barrel for a cold plunge?
Yes, but ensure it is made of BPA-free, food-grade plastic to avoid chemical leaching. You will also need to install a sturdy, insulated lid to maintain the temperature and prevent mosquitoes from breeding.
What is the best way to clean a wooden cold plunge barrel?
Use a solution of mild hydrogen peroxide or a specialized oxygen-based wood cleaner. Avoid bleach or harsh detergents, as these can strip the natural oils from the cedar and damage the wood fibers.
Are water socks necessary for cold water immersion?
They are not strictly necessary but are highly recommended for sessions longer than 3 minutes. They protect the small nerves in the toes from “ice burn” and make the experience much more tolerable for beginners.
How does an insulated cold plunge cover save money?
An insulated cover acts as a thermal barrier, reducing the rate of heat gain by up to 70%. This means you use significantly less energy (for chillers) or fewer ice packs to reach your target temperature the next day.
What should I look for in a cold plunge gift for an enthusiast?
Focus on high-utility items like heavy-duty 5mm neoprene boots, a high-accuracy floating thermometer, or a premium 800-GSM weight robe for post-plunge warming.