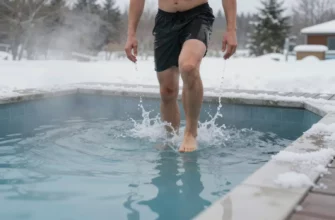
- Why the Grizzly 450 Cold Plunge is the New Standard for Home Recovery
- The Science of Ice Retention in Grizzly Coolers
- Grizzly 400 vs. Grizzly 450: Finding Your Perfect Fit
- Interior Dimensions and Water Displacement
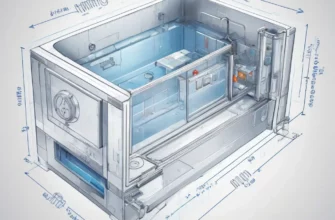
- How to Convert Your Grizzly 450 Cooler into a Cold Plunge
- Essential Modifications for Better Drainage
- Best Practices for Maintaining Your DIY Cold Plunge
- Water Sanitation and Filtration Options
- Common Mistakes to Avoid with Cooler Ice Baths
- Frequently Asked Questions
Why the Grizzly 450 Cold Plunge is the New Standard for Home Recovery
The shift from basic galvanized stock tanks to high-end rotomolded coolers marks a significant evolution in the DIY cold plunge community. While standard plastic bins lose temperature within hours‚ a Grizzly 450 provides a professional-grade thermal barrier that maintains sub-50-degree water with minimal effort. This transition is driven by the need for efficiency‚ as constant ice hauling becomes the primary deterrent for daily immersion practices.
Choosing a Grizzly cooler over a traditional chest freezer conversion eliminates the risks associated with electrical components and potential refrigerant leaks. The rugged nature of these coolers means they can withstand the rigors of outdoor placement‚ high-pressure water weight‚ and the chemical demands of water sanitation without degrading. It is a one-time investment that replaces the need for expensive dedicated chillers for many home users.
The Science of Ice Retention in Grizzly Coolers
The primary reason athletes choose Grizzly for cold water immersion is the pressure-injected polyurethane foam insulation found within the walls. This foam creates a dense thermal break that prevents the ambient outside air from warming the water inside. Unlike cheaper‚ blow-molded coolers that are hollow or have thin insulation‚ rotomolded construction ensures uniform wall thickness‚ which eliminates “hot spots” where heat could penetrate the tub.
Staying cold after a plunge is much easier when the water temperature remains stable throughout the day. Because the Grizzly 450 features a rubber gasket seal and heavy-duty latches‚ it effectively traps the cold air inside the unit. This airtight environment prevents “sweating” on the exterior of the cooler‚ meaning you can safely place these units on finished garage floors or patios without worrying about persistent condensation and mold growth.
Ice bath durability is another byproduct of the rotomolding process. The polyethylene shell is UV-resistant and won’t become brittle after years of sun exposure. This is a critical factor for those who keep their recovery setup in a backyard or on a deck. The material is also non-porous‚ which is essential for keeping water clean; bacteria and algae have a much harder time colonizing the smooth‚ hard surface of a Grizzly compared to the rougher interior of a standard stock tank.
Grizzly 400 vs. Grizzly 450: Finding Your Perfect Fit
Deciding between the Grizzly 400 and the 450 often comes down to the user’s physical dimensions and the specific goals of the immersion therapy. While both are massive‚ the 450 offers a bit more “stretch room” that can make the difference between a cramped soak and a relaxing recovery session. You must account for the fact that water displacement will raise the level significantly once you enter the tub‚ so internal volume is your most important metric.
| Feature | Grizzly 400 Cooler | Grizzly 450 Cooler |
|---|---|---|
| Total Capacity | 100 Gallons (400 Quarts) | 112.5 Gallons (450 Quarts) |
| Internal Length | Approx. 49 Inches | Approx. 52 Inches |
| Empty Weight | ~82 lbs | ~90 lbs |
| Ideal User Height | Up to 5’11” | 6’0″ and Taller |
| Footprint | Compact for Garages | Requires More Floor Space |
Interior Dimensions and Water Displacement
When calculating the cooler capacity for ice baths‚ you have to look beyond the quart rating and focus on the usable internal length. A Grizzly 400 cold plunge is an excellent choice for individuals who prefer a more upright‚ “seated” position with their knees bent. However‚ for those over six feet tall‚ the Grizzly 450 is the gold standard because it allows for more leg extension‚ which is vital for keeping the lower extremities submerged without having to hunch the upper body.
Weight is a massive factor that many DIYers overlook until the cooler is already in place. A full Grizzly 450 holds over 112 gallons of water; at roughly 8.34 pounds per gallon‚ the water weight alone exceeds 930 pounds. When you add the weight of the cooler and a 200-pound adult‚ the total load can exceed 1‚200 pounds on a very small footprint. Always ensure your deck or flooring can handle this concentrated load before filling the unit.
Portability is a relative term with these units. While they have molded-in handles‚ moving a 450-quart cooler is a two-person job even when empty. If you plan on moving your setup frequently‚ the Grizzly 400 offers a slightly more manageable profile. However‚ if the unit is meant to be a permanent fixture in a home gym‚ the extra 12.5 gallons of volume in the 450 provides a much more immersive and comfortable experience for the average athlete.
How to Convert Your Grizzly 450 Cooler into a Cold Plunge
The conversion process is relatively straightforward‚ but attention to detail will prevent leaks and maintenance headaches down the road. Because these coolers are designed for commercial use‚ they are built to be modified. Your primary goal is to ensure the unit is easy to drain and that the water remains sanitary for multiple uses‚ which saves you both time and money on ice.
- Sanitize the Interior: Use a mild dish soap and warm water to remove any manufacturing residues or dust. Avoid using abrasive scrubbers that could scratch the polyethylene.
- Check the Gasket: Inspect the lid’s rubber gasket to ensure it is seated properly in the groove. A tight seal is what prevents the “chimney effect” where cold air escapes and warm air enters.
- Position the Cooler: Place the cooler in its final location before adding any water. Once filled‚ the unit is impossible to move without draining it completely.
- Thread the Drain: Install your chosen drainage modification to the 2-inch outlet. Ensure you use food-grade silicone or Teflon tape on any threaded connections.
- Fill and Test: Fill the cooler halfway to check for leaks at the drain plug. If it holds‚ continue filling until the water level is about 8-10 inches from the top to allow for body displacement.
Essential Modifications for Better Drainage
The standard 2-inch drain plug on a Grizzly 450 is robust‚ but it isn’t always convenient for indoor or garage use. Many users choose to modify the cooler by installing a PVC or stainless steel ball valve. This allows you to attach a standard garden hose to the cooler‚ directing the old water to a floor drain or out into the yard without flooding your immediate workout area.
When modifying a cooler of this size‚ you must be careful not to cross-thread the plastic bungs. The Grizzly 450 cooler cold plunge setup relies on a watertight seal at the drain to maintain its thermal efficiency. If you decide to install a permanent filtration system or a chiller later on‚ the large drain size makes it easy to adapt to 1-inch or 2-inch NPT fittings without having to drill new holes into the insulated walls of the cooler.
Best Practices for Maintaining Your DIY Cold Plunge
Maintenance is the difference between a refreshing daily ritual and a swampy‚ bacteria-filled chore. Because the Grizzly keeps water cold for so long‚ you won’t be changing the water as often as you would in a standard tub. This makes water chemistry and physical hygiene critical components of your routine. If you manage the water correctly‚ you can keep the same 112 gallons of water fresh for up to four weeks.
- Shower Before Entry: This is the most effective way to keep the water clean. Removing body oils‚ lotions‚ and sweat prevents the formation of a “scum line” on the cooler walls.
- Use a Skimmer Net: Even with the lid closed‚ small debris can enter when you climb in. Spend thirty seconds skimming the surface after each use.
- Monitor Water Clarity: If the water becomes cloudy or develops an odor‚ drain it immediately. Never push the limits of water sanitation as it can lead to skin irritation or infections.
- Wipe the Seal: Every time you drain the cooler‚ wipe down the lid gasket with a damp cloth to remove any grit that might prevent an airtight seal.
Water Sanitation and Filtration Options
Keeping water clean in a rotomolded cooler requires a balanced approach. Many users prefer using Epsom salts because of the added magnesium benefits‚ but be aware that high concentrations of salt can eventually corrode metal drain fittings if they are not made of high-grade stainless steel. A better alternative for long-term use is a small amount of hydrogen peroxide or a dedicated non-chlorine shock treatment designed for hot tubs.
Ice bath maintenance also involves physical cleaning of the rotomolded surface. When you perform a full water change‚ use a mixture of white vinegar and water to spray down the interior. This natural acid helps break down any mineral deposits from hard water without leaving behind toxic fumes that you would breathe in during your next plunge. Always rinse the cooler thoroughly after cleaning to ensure no residue remains to irritate your skin during immersion.
Common Mistakes to Avoid with Cooler Ice Baths
One of the most frequent errors is overfilling the tub before getting in. It is a simple physics problem: your body will displace a volume of water equal to your weight. If you fill a Grizzly 450 to the top‚ you will end up with ten gallons of water on your floor the moment you sit down. Always start with the water level lower than you think you need; you can always add a bit more with a hose once you are submerged.
Warning: Never place a filled Grizzly 450 on an elevated wooden deck without first consulting a structural engineer. The concentrated weight of 1‚200+ pounds in a small 5-foot area can cause structural failure or long-term sagging in standard residential decking.
Another common mistake is neglecting the lid gasket. While the latches are designed to be tight‚ over-stretching them or leaving the lid partially open will destroy the ice retention performance. If you notice the water temperature rising faster than usual‚ check for gaps in the seal or debris stuck in the gasket track. Additionally‚ avoid using “pool grade” chlorine tabs in a small cooler; the concentration is often too high for the small water volume and can damage both the cooler lining and your skin.
In my professional experience as a physical therapist‚ the way you sit in a cold plunge is just as important as the temperature of the water. In a 450-quart cooler‚ I always advise users to maintain a slight bend in the knees rather than locking them out. This prevents unnecessary strain on the lower back and allows for better circulation to the lower extremities. Furthermore‚ to maximize vagus nerve stimulation‚ ensure the water level reaches the top of your shoulders‚ just below the jawline; The Grizzly 450’s depth is particularly advantageous here‚ as it allows taller individuals to achieve this full immersion without having to awkwardly slide down into the tub‚ which can lead to joint impingement over time.
Frequently Asked Questions
Yes‚ the Grizzly 450 is the preferred choice for taller individuals. Its internal length of approximately 52 inches allows most people up to 6’4″ to submerge comfortably with their knees slightly bent.
How much ice does it take to chill a Grizzly 450?
Depending on your starting water temperature‚ it typically takes 40 to 80 pounds of ice to reach the 45-50 degree range. However‚ the cooler’s insulation will keep it at that temperature for several days once the initial chill is achieved.
Can I leave my Grizzly cold plunge outside in the winter?
Absolutely. The rotomolded polyethylene is designed for extreme weather. However‚ you should keep the lid latched to prevent heavy snow loads from bowing the lid and ensure the drain doesn’t freeze solid and crack.
Is the Grizzly 400 cooler large enough for a daily cold plunge?
Yes‚ the Grizzly 400 is an excellent space-saving option. It is ideal for individuals with a smaller frame or those who have limited floor space in a garage or apartment balcony.
Do I need to seal the lid of my Grizzly cooler for a cold plunge?
The factory-installed rubber gasket is usually sufficient for excellent cold retention. Some users add adhesive weather stripping for an even tighter seal‚ but the standard latches provide enough pressure for most home setups.