- Why the Freezer Cold Plunge is the Ultimate Budget Setup
- The Economics of a $600 Chest Freezer Cold Plunge
- Choosing the Best Chest Freezer Size for Your Cold Plunge
- How Big of a Chest Freezer Do You Really Need?
- Can You Use a Deep Freezer as a Cold Plunge Safely?
- The Golden Rule: Unplug Before You Plunge
- How To Turn a Deep Freezer into a Cold Plunge: Step-by-Step
- Sealing the Seams for a Watertight Finish
- Temperature Control: Keeping it Above Freezing
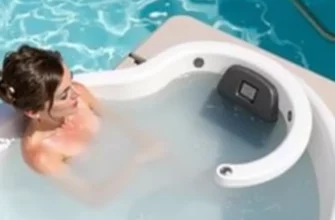
- Essential Accessories: Mats, Filtration, and Maintenance
- Protecting Your Floors and Managing Condensation
- The Science: Cold Shock Protein Release and Recovery
- How Cold Exposure Triggers Your Body’s Internal Repair
- Common Mistakes to Avoid with Your DIY Freezer Setup
- Expert Perspective: DIY Cold Therapy
- Frequently Asked Questions
Why the Freezer Cold Plunge is the Ultimate Budget Setup
The rise of cold therapy has brought about a wave of high-end, luxury cold tubs that often carry price tags exceeding $5,000. For many enthusiasts, this entry cost is a significant barrier to establishing a daily recovery routine.
Converting a chest freezer into a dedicated cold plunge offers a professional-grade experience at a fraction of the cost. By repurposing a standard household appliance, you gain a thermally insulated vessel that maintains near-freezing temperatures without the constant need for bags of ice.
The Economics of a $600 Chest Freezer Cold Plunge
A brand-new chest freezer typically costs between $400 and $800 depending on the volume. When you factor in the cost of a high-quality sealant and a digital temperature controller, the total investment usually sits well under $1,000.
Compare this to the ongoing expense of buying ice for a standard tub. At $3 to $5 per bag, and requiring at least five bags per session to reach therapeutic temperatures, a DIY freezer setup pays for itself in less than six months of regular use.
Beyond the initial purchase, the energy efficiency of a chest freezer is remarkably high. Because the units are designed to keep food frozen, they feature thick foam insulation that holds water at 45 degrees Fahrenheit with minimal electrical draw, often costing less than $5 per month in utility increases.
Choosing the Best Chest Freezer Size for Your Cold Plunge
Selecting the right dimensions is the most critical step in your DIY journey. If the unit is too small, you won’t be able to achieve full neck-deep submersion; if it is too large, you waste water and floor space.
You must look past the advertised cubic footage and measure the internal floor length. Most freezers have a “hump” where the compressor is located, which reduces the available floor space for your legs by about 10 to 12 inches.
| User Height | Recommended Freezer Size | Internal Length Goal |
|---|---|---|
| Under 5’6″ | 7 ⸺ 9 Cubic Feet | 38 ⸺ 42 Inches |
| 5’7″ to 6’0″ | 10 ౼ 12 Cubic Feet | 44 ౼ 48 Inches |
| 6’1″ and Over | 14 ⸺ 16+ Cubic Feet | 52+ Inches |
How Big of a Chest Freezer Do You Really Need?
For most adults, a 14-cubic-foot freezer is considered the “Goldilocks” size. It provides enough length to sit comfortably with legs extended while remaining compact enough to fit in a standard garage or basement corner.
If you are an athlete over six feet tall, prioritize the 15;8 or 18 cubic foot models. These units provide the depth necessary to ensure your shoulders are completely covered, which is vital for triggering the mammalian dive reflex and maximizing the systemic benefits of the cold.
Always verify the “internal clear space” before purchasing. Some modern freezers have large plastic baskets or unconventional interior shapes that can restrict your movement or make sealing the seams significantly more difficult.
Can You Use a Deep Freezer as a Cold Plunge Safely?
The marriage of water and electricity is inherently dangerous, and a freezer conversion must be handled with extreme caution. While these units are designed to hold ice, they are not naturally built to hold hundreds of gallons of liquid water.
Safety management is not about cutting corners; it is about creating a fail-safe environment. You must treat the electrical components of the freezer as a lethal hazard when the unit is filled with water.
The Golden Rule: Unplug Before You Plunge
The only way to guarantee 100% safety is to physically remove the power cord from the outlet before your skin touches the water. Even with a GFCI, a mechanical failure or a slow leak into the motor housing could result in a fatal electrical shock.
Many users install a “kill switch” or a remote-controlled outlet to make this easier, but a manual unplug remains the gold standard. To ensure you never forget, place your towel or phone on top of the unplugged power cord so you must interact with it before getting in.
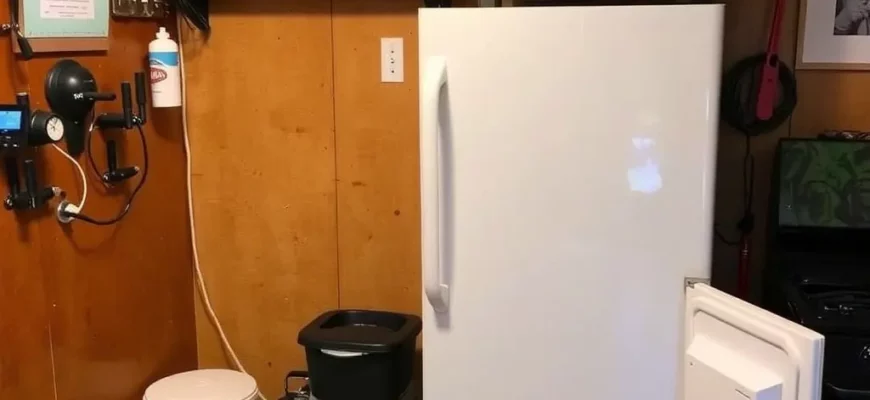
How To Turn a Deep Freezer into a Cold Plunge: Step-by-Step
The conversion process requires patience and attention to detail, specifically regarding the watertight integrity of the unit. A single pinhole leak can lead to rust, which will destroy the freezer’s cooling ability within months.
Before starting, ensure the freezer is completely dry and at room temperature. Use isopropyl alcohol to clean all interior seams and corners to ensure the sealant adheres properly to the plastic or metal lining.
- Seal the Seams: Apply a generous bead of marine-grade sealant or JB WaterWeld to every joint. Use your finger to smooth the sealant into a concave shape, ensuring no air bubbles are trapped.
- Allow for Curing: Wait at least 24 to 48 hours for the sealant to fully cure. Rushing this step is the primary cause of leak-related failures in DIY builds.
- Leak Test: Fill the freezer with only 4 inches of water and let it sit for 12 hours. Check the exterior floor for moisture before filling the rest of the way.
- Install the Controller: Plug the freezer into an external temperature controller like an Inkbird. Place the probe inside the water (ideally inside a protective thermowell) to manage the cooling cycles.
- Set the Temperature: Program the controller to turn the freezer off when it hits 45°F and back on at 48°F. This prevents the water from freezing into a solid block which could expand and crack the freezer walls.
Sealing the Seams for a Watertight Finish
Standard silicone caulk from a hardware store is often insufficient because it cannot withstand the constant hydrostatic pressure of 800 pounds of water. You must use a sealant specifically rated for marine use or underwater applications.
Pay special attention to the bottom corners where three seams meet. This is the highest pressure point in the tub. If you notice the sealant lifting or peeling after a few weeks, drain the unit immediately and re-apply a more robust epoxy-based sealant to prevent permanent structural damage.
Temperature Control: Keeping it Above Freezing
Without an external thermostat, a chest freezer will continue to cool the water until it becomes a solid mass of ice. This not only makes plunging impossible but also voids the warranty and risks bursting the internal refrigerant lines.
An external controller acts as a brain for the unit. It cuts power to the compressor once the target temperature is reached. For beginners, aiming for 50°F is a safe starting point; as you adapt, you can gradually lower the setting toward the low 40s.
Essential Accessories: Mats, Filtration, and Maintenance
A freezer cold plunge is a heavy piece of equipment. When filled, a 14-cubic-foot unit can weigh over 1,000 pounds. You must ensure your flooring can handle this concentrated load, especially if placing the unit on a wooden deck or in an upper-level room.
Condensation is another factor many beginners overlook. Because the exterior of the freezer stays cool, moisture from the air will condense on the outside of the unit and drip onto the floor, potentially causing mold or wood rot over time.
Protecting Your Floors and Managing Condensation
Always place your freezer on a heavy-duty rubber stall mat, typically found at farm supply stores. These mats are designed to handle immense weight and provide a waterproof barrier that protects your subfloor from both leaks and condensation drips.
To manage water quality, you have two main options: frequent water changes or a filtration system. If you choose not to install a pump and filter, you should add 1/2 cup of 35% food-grade hydrogen peroxide weekly and change the water every 14 days to prevent biofilm and bacterial growth.
The Science: Cold Shock Protein Release and Recovery
The primary driver behind the cold plunge craze isn’t just “feeling awake”; it is the profound biological shift that occurs when your internal temperature drops. When you submerge in water below 55°F, your body enters a state of controlled stress.
This stress triggers the release of cold shock proteins, most notably RBM3 (RNA-binding motif protein 3). These proteins are highly concentrated in the brain and have been shown to repair damaged synapses, offering a potential neuroprotective effect against cognitive decline.
How Cold Exposure Triggers Your Body’s Internal Repair
Beyond the brain, cold exposure is a massive catalyst for metabolic health. It stimulates the production of brown adipose tissue (BAT), or “brown fat.” Unlike white fat, which stores energy, brown fat burns calories to generate heat, effectively turning up your body’s internal furnace.
The anti-inflammatory effects are equally impressive. Cold water immersion causes systemic vasoconstriction, which flushes metabolic waste from muscle tissue and reduces the chemical markers of inflammation. This is why athletes who use a freezer cold plunge report significantly less delayed onset muscle soreness (DOMS) after heavy training sessions.
Common Mistakes to Avoid with Your DIY Freezer Setup
Even with a perfect build, user error can lead to a messy or dangerous experience. Learning from the mistakes of the DIY community will save you time and money.
| Mistake | The Consequence | The Fix |
|---|---|---|
| Overfilling the Tub | Water spills into the lid and motor. | Fill only 60% full; your body displacement will do the rest. |
| Using Epsom Salts | Rapid corrosion of the metal liner. | Use a pond liner or stick to plain water and peroxide; |
| Ignoring the Probe | The water freezes solid. | Secure the temperature probe halfway down the water column. |
| Leaving the Lid Open | The compressor works overtime and dies. | Always keep the insulated lid closed when not in use. |
Expert Perspective: DIY Cold Therapy
In my experience as a recovery specialist, the biggest mistake people make is thinking they need the water at 33°F to get results. I always advise my clients that the minimum effective dose for cold shock protein release occurs between 45°F and 55°F. In a DIY freezer setup, keeping the temperature slightly higher—around 48°F—actually extends the life of your compressor and reduces the risk of skin damage or “ice burn.” You don’t need to suffer to see the metabolic and cognitive gains; consistency in the water is far more important than extreme temperature records.
Frequently Asked Questions
For the average adult, a 14-cubic-foot chest freezer is the ideal balance of size and efficiency, allowing for full submersion without taking up excessive space.
Do I need to keep the freezer plugged in while I’m inside?
Absolutely not. You must unplug the unit completely before entering to eliminate any risk of electrocution from a potential leak or mechanical failure.
How do I seal a freezer for a cold plunge?
Use a high-quality marine-grade sealant or JB WaterWeld on all interior seams. Ensure the surface is cleaned with alcohol and allow a full 48 hours for the sealant to cure before adding water.
Is a freezer cold plunge better than a Frost Locker?
A freezer plunge is significantly cheaper (approx. $600 vs $5,000), but a Frost Locker or professional unit offers a warranty, built-in filtration, and is specifically engineered for water storage.
How do I keep the water clean without a filter?
Use food-grade hydrogen peroxide (35% concentration) and a fine-mesh hand skimmer to remove debris. Change the water every two weeks if you are the only user.
Can I use Epsom salts in a freezer cold plunge?
No. Salts are highly corrosive and will eat through the thin metal lining of a standard freezer. If you want to use salts, you must install a thick plastic pond liner first.