- Master the Basics: How to Do a Cold Plunge the Right Way
- Finding the Right Temperature for Beginners
- The Step-by-Step Process for Your First Session
- How to Use a Cold Plunge Safely
- No Equipment? How to Cold Plunge in the Shower
- The Best Way to Do a Cold Plunge in the Shower
- The Home Setup: How to Cold Plunge in Your Bathtub
- Setting Up Your Own Cold Plunge in the Tub
- Contrast Therapy: How to Do a Hot and Cold Plunge
- The Protocol for Switching Between Heat and Cold
- Preparation and Gear: What to Wear and How to Get Ready
- What Do You Wear in a Cold Plunge?
- Common Pitfalls to Avoid During Your Plunge
- Staying Safe When Doing a Cold Water Plunge at Home
- Frequently Asked Questions
Master the Basics: How to Do a Cold Plunge the Right Way
Stepping into a tub of near-freezing water sounds like a form of torture to the uninitiated‚ but for those chasing peak performance‚ it is a foundational recovery tool. The process is less about enduring pain and more about mastering your body’s physiological response to acute stress.
When you learn the best way to do a cold water plunge‚ you are essentially training your nervous system to remain calm while under duress. This practice builds significant mental resilience that carries over into every other aspect of your daily life.
Finding the Right Temperature for Beginners
One of the most frequent mistakes is jumping into 40°F water on day one. For most people‚ a safe water temperature to start with is approximately 60°F (15°C). This provides a clear “cold” signal to the brain without triggering an uncontrollable panic response.
As your body adapts and you learn to manage the initial cold shock‚ you can gradually drop the temperature by 2-3 degrees each week. Most veteran practitioners find their “sweet spot” for metabolic benefits and brown fat activation between 45°F and 52°F.
Always listen to your body’s internal feedback loops. If you find yourself shivering uncontrollably before you even fully submerge‚ the water is likely too cold for your current level of cold-hardiness. Consistency matters more than extreme temperatures when you are first building the habit.
The Step-by-Step Process for Your First Session
Success in cold immersion is determined before your skin even touches the water. Establishing a repeatable routine helps signal to your brain that it is time to transition into a state of high-intensity focus;
The transition from a warm room to a cold tub creates a massive shift in blood flow. By following a structured entry protocol‚ you minimize the risk of the “gasp reflex‚” which can lead to hyperventilation if not managed correctly.
- Hydrate and Breathe: Drink a glass of room-temperature water 15 minutes prior. Spend 2 minutes practicing box breathing (4 seconds in‚ 4 seconds hold‚ 4 seconds out) to steady your heart rate;
- The Entry Phase: Step into the water feet first. Your extremities have the highest concentration of cold receptors‚ and submerging your feet and ankles first allows the brain to register the temperature change before your core is impacted.
- Submerge to the Neck: Lower yourself slowly until the water reaches your collarbone. This ensures full coverage of the “brown fat” stores located around the shoulder blades‚ which are essential for thermal stress adaptation.
- Control the Gasp: As the cold hits your chest‚ your natural instinct is to take short‚ shallow breaths; Force yourself to exhale slowly through pursed lips to keep your heart rate from spiking.
- The Quiet Phase: Once the initial 30 seconds pass‚ your skin will begin to feel numb. This is where the mental work happens; remain still and focus on a single point in the room to maintain your composure.
- The Exit and Warm-Up: Step out carefully‚ as your coordination may be slightly dampened. Avoid a hot shower immediately; instead‚ pat yourself dry and let your body generate its own heat for 10 minutes to maximize the metabolic “afterburn.”
How to Use a Cold Plunge Safely
To get the most out of your session‚ focus on your posture while submerged. Keeping your hands tucked into your armpits or resting them on your thighs can help manage the stinging sensation in your fingers. Many find that keeping the hands and feet out of the water during their first few sessions makes the experience significantly more tolerable.
The total duration of your session should be guided by the “11-minute rule.” Research suggests that 11 total minutes of cold immersion per week‚ split into 2-3 sessions‚ is the threshold for significant health benefits. Pushing beyond 5 minutes in a single session rarely provides additional gains and increases the risk of hypothermia.
No Equipment? How to Cold Plunge in the Shower
You do not need a five-thousand-dollar custom tub to start reaping the benefits of cold water immersion. The shower in your bathroom is a perfectly viable tool for building cold tolerance and stimulating the vagus nerve.
The key to a successful shower-based plunge is the “contrast finish.” Start with your usual warm shower to relax the muscles and open the pores‚ then prepare for the transition. This method is highly effective for soothing sore muscles after a long day of physical activity.
The Best Way to Do a Cold Plunge in the Shower
When you are ready‚ turn the dial to the coldest setting. Do not ease into it; let the cold water hit your limbs first‚ then move your chest and upper back directly under the stream. Targeting the upper back and neck is critical because this area contains the highest density of mitochondria-rich brown adipose tissue.
Aim for 30 seconds of continuous exposure during your first week. It will feel intense because the water is moving‚ which prevents a “thermal layer” of warmer water from forming around your skin. This makes a 55°F shower feel significantly colder than a 55°F stagnant bath.
The Home Setup: How to Cold Plunge in Your Bathtub
If you are ready to move beyond showers‚ your standard household bathtub is the next logical step. It allows for full hydrostatic pressure‚ which is excellent for reducing edema and swelling in the lower body. However‚ there are logistical challenges regarding temperature maintenance and depth.
| Feature | Standard Bathtub (DIY) | Dedicated Cold Plunge Tub |
|---|---|---|
| Initial Cost | Low (Cost of ice only) | High ($1‚000 ー $5‚000+) |
| Temperature Control | Manual (Requires bags of ice) | Digital (Built-in chillers) |
| Convenience | Low (Filling and draining takes time) | High (Always cold and filtered) |
| Depth | Limited (Hard to submerge shoulders) | Optimal (Designed for full immersion) |
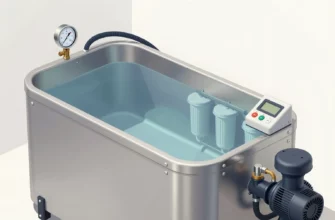
Setting Up Your Own Cold Plunge in the Tub
To reach an effective temperature in a standard tub‚ you will need a significant amount of ice. For a half-filled tub‚ 40 to 60 pounds of ice is typically required to drop the temperature from 65°F to the low 50s. If you are wondering what you can use for a cold plunge besides a tub‚ many enthusiasts opt for large livestock troughs or insulated rain barrels which offer more depth for a lower price point.
When using a standard tub‚ sit with your knees bent and try to lean back so the water covers your chest. If the tub is too shallow‚ focus on alternating between submerging your torso and your legs to ensure all major muscle groups receive the benefits of the thermal load.
Contrast Therapy: How to Do a Hot and Cold Plunge
Contrast therapy is a powerful protocol used by elite athletes to “flush” the system. By alternating between hot and cold‚ you create a physiological pump. The heat causes your blood vessels to open wide‚ and the cold causes them to rapidly constrict‚ which helps move metabolic waste products out of the muscle tissue.
This cycle is one of the fastest ways to improve circulation and reduce the heavy feeling in your legs after a high-intensity workout. It is also remarkably effective for mental clarity‚ as the rapid shifts in temperature force a high level of sensory awareness.
The Protocol for Switching Between Heat and Cold
The most common and effective ratio is 3 minutes of heat for every 1 minute of cold. Repeat this cycle 3 to 5 times. If you have access to a sauna and a cold tub‚ this is the gold standard. If not‚ a hot bath followed by a cold shower works well.
Always end your session on cold if your primary goal is reducing inflammation or waking up the nervous system. Ending on cold ensures that your blood vessels remain constricted‚ which prevents the “pooling” of fluids in the extremities. However‚ if you are doing this before bed‚ some prefer ending on heat to encourage total muscle relaxation.
Preparation and Gear: What to Wear and How to Get Ready
Preparing for the cold is as much about logistics as it is about mindset. Having the right gear can turn a miserable experience into a manageable routine. While many purists prefer going in with nothing but swimwear‚ certain accessories can help you stay in longer and stay safer.
- Swimwear: Standard trunks or a swimsuit are all you need. Avoid heavy cotton fabrics that hold cold water against the skin after you exit.
- Neoprene Booties: The toes are often the first part of the body to feel “painful” cold; Wearing 3mm neoprene socks can significantly extend your session time by protecting the extremities.
- Wool Beanie: You lose a significant amount of heat through your head. If you are plunging outdoors in winter‚ a hat helps maintain your core temperature.
- Post-Plunge Towel: Have a large‚ high-absorvency towel or a hooded robe ready the moment you step out.
- Timer: Use a waterproof timer or a phone placed safely away from the water. Never “guess” your time‚ as the cold can distort your perception of passing minutes.
What Do You Wear in a Cold Plunge?
If you are plunging in temperatures below 45°F‚ consider neoprene gloves in addition to booties. The “stinging” sensation in the fingers is often the primary reason people cut their sessions short. By protecting these small surface areas‚ you can keep your core submerged for the full duration required to trigger a deep metabolic response.
Before you get in‚ ensure your environment is set up for a “quick exit.” This means having your dry clothes laid out and a warm drink nearby. How you prepare for a cold water plunge dictates how quickly you recover your internal temperature afterward.
Common Pitfalls to Avoid During Your Plunge
Safety is the most important variable in any cold water immersion practice. While the benefits are numerous‚ the risks of cold shock and hypothermia are real if you do not respect the water. One of the most dangerous phenomena is the “afterdrop‚” where your core temperature continues to fall even after you have exited the water.
To stay safe after a plunge‚ never jump into a hot shower immediately. This causes peripheral vasodilation‚ which sends cold blood from your extremities back to your heart and brain too quickly‚ potentially causing fainting or heart palpitations. Wait at least 10-15 minutes for your body to stabilize.
Staying Safe When Doing a Cold Water Plunge at Home
If you are a beginner‚ never plunge alone. Have someone in the house who knows you are in the water. It is rare‚ but the initial cold shock can occasionally cause a person to lose their breath or become disoriented. Staying safe after a cold plunge also involves gentle movement; doing a few air squats or pacing around the room helps re-engage your muscles and generate natural heat.
Another common mistake is staying in too long. There is a “diminishing returns” point where more time does not equal more health benefits. Three to five minutes is the maximum most people ever need. If you start to feel a “sweet” or “warm” sensation while in the cold‚ exit immediately; this is a sign that your body is losing its ability to regulate its temperature.
In my professional experience working with athletes‚ the physical cold is only 20% of the challenge; the other 80% is the psychological transition. I always advise my clients to focus on the “gap” between the impulse to scream and the decision to breathe. When you master that gap‚ you are training your autonomic nervous system to stay in a parasympathetic (relaxed) state while the sympathetic (stress) system is screaming. This is the ultimate “nervous system gym.” The goal isn’t to be a person who can handle cold water; it’s to be a person who can handle pressure without losing their cool. I have found that those who approach the water with a sense of curiosity rather than combativeness tend to see the best long-term results in their mental health and recovery metrics.
Frequently Asked Questions
Most of the physiological benefits occur within 1 to 5 minutes. There is no evidence that staying in longer provides extra benefits‚ and it significantly increases the risk of hypothermia.
Is a cold shower as effective as a cold plunge?
Cold showers are excellent for building a habit and mental toughness‚ but full immersion is more effective. The hydrostatic pressure of a plunge helps with circulation and ensures a more consistent “thermal load” on the body.
What is the best time of day to cold plunge?
Morning is generally best as it triggers a significant release of dopamine and norepinephrine that lasts for hours. Avoid plunging immediately after a hypertrophy-focused weightlifting session‚ as it may blunt muscle growth signals.
Can I do a cold plunge every day?
Yes‚ daily use is safe for most healthy individuals. However‚ if you feel chronically fatigued or find your resting heart rate increasing‚ you may be overtaxing your system and should reduce frequency to 3 times per week.
Should I put my head under in a cold plunge?
Beginners should keep their head above water to avoid an intensified cold shock response. While “ducking” the head can stimulate the vagus nerve‚ it should only be done by experienced practitioners for a few seconds at a time.